Brining – How to take your chicken to the next level

If you’ve ever been to a BBQ when the host puts a few boneless chicken breasts on the grill, you may know how bad dry chicken can be. A lot of people prefer boneless/skinless chicken breasts because they are basically clean, white meat with no fat. Unfortunately, when cuts of meat have little fat, they also have a tendency to become dry when cooked (and especially dry when over cooked). Chicken really isn’t something you want to leave under-cooked, so often, when you eat a chicken breast off the grill it can often be overly dry.

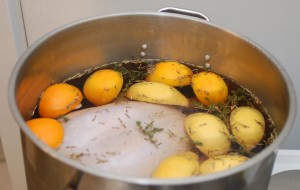
Brining is a extremely easy way to help keep your chicken cut moist when cooked on the grill. The process of brining involves introducing salts and water to the cells of meats, allowing the muscle tissue to absorb and retain water while cooking. It also helps breakdown proteins in the meat. This makes the meat a little softer while eating.


It’s good to know that brining is actually a very easy and quick process when it comes to chicken. A basic brine consists of water, salt, sugar and spices. That’s it.

A good gauge for the brine is 10% salt and 5% sugar. So, depending on how much chicken you are making, gear your water/salt/sugar mix accordingly. You also can use this marinating period to infuse any type of flavor you wish to include into the meat. As the salt brings the liquid into the cells, it can take along any of the flavors you’ve added to your brine.

For a quick brine, just use hot water to dissolve your salt and sugar. If you have some time, boil the water to fully dissolve everything. Once your brine is ready, just pour it over your chicken which can be in a ziploc bag or in a baking pan. Then place it into the fridge. Some people leave the brine at room temp, but it’s whatever you are comfortable with.

The tricky part with brining is the timing. For breasts, like our Local T&T chicken breasts, you want to go from 1 to 2 hours. Leaving the brine in too long will give you salty meat. Not long enough and you won’t get the desired effects. For whole chickens, you can shoot for a little longer, anywhere from 4 to 6 hours. Just remember, the smaller the cut, the shorter amount of time it will take for your brine to penetrate.

Next time you are grilling or frying chicken, give brining a little try.

The Grill Brush

We use our grill a lot. It isn’t uncommon for 3 of our meals made at home during a week to involve a grill of some sort. When you grill often, you probably use your grill brush a lot.

Unfortunately, I’ve noticed recently that ‘grill brushes’ are not what they use to be. The other day I was doing a little scrub on the grill after burning off some BBQ sauce and I felt that the brush really wasn’t working. I flipped over and saw that the wire bristles were 90% gone! The few lone survivors on the brush were quickly joining their friends at the bottom of our grill. The worst part was that we literally just bought this brush what seemed to be not a month ago. And I’m not sure if you’ve noticed, but they aren’t cheap. I think this brush cost us close to $60TT. That’s a pound of steaks from Blooms and almost a half of pound of steaks from the other guys! 🙂

I’m not sure where along the line, but it seems that the grill brush manufacturers have thrown quality out the window.

Here’s a solution I came up with!

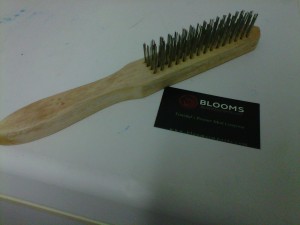
I went to the hardware store and looked in the ‘cleaning’ isle. I found the wooden handle brushes and they were about a third of the price. Now, the handles aren’t long, so your hand gets a little close the the grill. And they don’t have a ‘scraper’. (I use a putty knife anyways). But pound for pound, these little guys work 10x better than the plastic grill brushes. I used it for the first time last night and was really surprised by the outcome. If this works for at least 1.5 weeks without falling apart, it should also be much more cost effective.

Next time you are in the hardware store, pick up one of these and a putting knife/paint scraper. I think you will be surprised how easy it is to use these two WMDs on your grill grate to make sure you get them sparkling and ready for a Bloom’s Ribeye.

I bought a couple extra if anyone wants to add to their order. Just let me know.


A how-to on our Baby Back Rib Portions

Our Baby Back Rib Portions are one of our most popular items. However, we always get a lot of questions on what they are and how to cook them.

These portions are 1, 2 and 3 rib portions of baby back ribs. They are not in ‘rack form’ but they are extremely easy to cook and very forgiving on the grill/smoker/oven. They are baby backs, so they are extremely tender and have great flavor.

Best of all, they are very affordable. These ribs are about half the price of our normal baby back ribs (and much less than half the price of the other guys). They come in a 10lb case, so they are perfect for a bbq DDI or a lime in the backyard.

So, here is a little video on how Jason from Blooms cooks his Baby Back Rib Portions. Most of the ribs in this video were smoked and grilled, but it’s also extremely easy to cook in the over if you don’t have a grill or a smoker. Any questions on the recipe please don’t hesitate to shoot us an email: jason@bloomsimports.com


20% ‘solution’? What is ‘solution’? A few notes on selecting steaks.

I always like to take a look at grocery stores around Trinidad to see what they have to offer in terms of steaks. Most of the time the steaks you come across are frozen cut clod steaks, with the occasional portion controlled strip or tenderloin.

I was browsing a store in Diego Martin and came across a line of steaks that I had only seen once before. A while back we had actually researched the brand to see if it was something we wanted to carry.

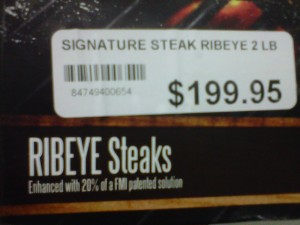
For a minute, let’s forget the fact that these Ribeye steaks are selling for $100TT per pound. If you read the fine print, you’ll notice that these Ribeyes (and every other type of steak in this line) are ‘Enhanced with 20% of a FMI patented solution’. What exactly does that mean?

There are several different reasons that a consumer would want and a company would ‘marinate’ their steaks with a solution prior to end-use. Sometimes, this is done with a natural tenderizer that helps ensure the steak is cooked tender each and every time, even when cooked thoroughly.  A lot of restaurants will use these steaks because they are required to cook steaks to ‘well done’ for some customers. It allows them to provide the customer with a tender steak, no matter what the end temperature. Tenderized steaks are perfectly fine and are usually delicious. We carry a few tenderized brands for this reason, but we will have done quite a bit of research to make sure the line of tenderized steaks we offer are marinated correctly.

In the case of the steaks above, the ‘patented solution’ being used is a salt solution with a few additional ingredients (water, ammonium hydroxide, etc). This is done to allow them to take a cheaper cut of meat and make it cook/act like a more expensive cut of meat. Remember, steaks like Ribeye are tender because of the marbling of fat throughout the meat. When that fat heats up, it melts into the surrounding muscle/meat and makes it tender. With lower-end/cheaper cuts of beef, you lack the marbling throughout the steak. Therefore, when the steak is cooked you do not get the ‘tender’ effect.

So, are tenderized steaks fine to eat? Sure. A lot of people prefer them because they help achieve a very tender steak even if you aren’t a ‘Pro Griller’.

Should they be $100 a pound? Absolutely not. The steaks pictured above are not Choice or even Select grade Ribeyes. They are what the beef industry calls Utility. These primal cuts are much much cheaper than purchasing a Prime, Choice or Select version of the meat. The usual reason is the marbling and/or the size of the primal cut. So the steak above was probably very cheap to begin with, it was cut into 16oz portions and then soaked in a solution to make it act like a expensive steak. Remember, when you are buying something that is claiming 20% solution added, you are paying a ‘Ribeye Price’ for salt water. A steak such as this should actually be much cheaper than it’s USDA Choice counterpart. It’s a lower grade steak and 1/5th of the weight is actually salt water. (our Choice Ribeye steaks usually sell for $70tt a pound).

Again, tenderized steaks are perfectly fine and just a matter of personal preference. However, it should not be treated as something that should command a higher price. The packaging may look nicer, but it doesn’t mean you are getting a nicer steak.

Happy Grilling!

How we deliver?

As many of you know, we offer free delivery of items within Port of Spain. All we ask is that the order amount be over $200TT. For those of you living outside of POS, we now do pick-ups at our Cocorite location Monday Thru Friday from around 11 am until 5pm. And also now on Saturday from 9:30am until 12:30pm.

To ensure your meats are delivered perfectly frozen, we now employ the use of our Keep It Cool freezer bags. These bags work better than ice chests and guarantee your meats reach your door step as cold as they were in our freezer.

Attention Crab Back Makers!

After a long search, we have finally found a consistent supply of high quality Crab Meat. This crab meat is in 5lb packs and is a product of the USA. So no more picking shells out of your meat before you mix it up. This is also ‘net weight’ which means you aren’t paying for water, you are paying for crab.

If you are a crab back producer OR know of someone who is, please have them contact Jason to discuss pricing and quantities they would like. We have done quite a bit of research and are confident we can provide customers with the best pricing on a higher quality product.


What is Kobe beef?

Kobe beef refers to cuts of beef from a specific breed of cattle, Wagyu. Much like Black Angus, Hereford, and Charolais are specific breeds of beef cattle. Because of it’s texture and marbling, it is said to be one of the finest breeds of cattle available. It’s considered a delicacy in Japan, which eats quite a bit of beef per capita. It’s said to surpass the PRIME classifications set by most of the grading bodies of other countries.

In order to carry the Kobe label, this beef must be from the Kobe region of Japan. Now-a-days, the Japanese are commissioning a very select few American breeders/farms to raise some of this cattle for them. This allows a lot more access to Kobe beef for people like us down here in Trinidad. There isn’t much of a demand for Wagyu/Kobe beef in the States yet, but the demand is slowly growing.

Supposedly, Wagyu cattle live a luxurious life; they eat organic grains, drink Japanese beer and sake mash, and even listen to tranquil music while getting daily massages.

Po-Po’s Old Fashioned Eye of Round Roast Recipe

Roasting an Eye of Round – A very easy approach

The other day we prepared one of our Eye of Round roasts. The recipe was incredibly easy and the roast came out delicious. This very affordable cut of beef can come out delicious if roasted correctly. Here’s how we did it:

Step 1

Picture


Pre-heat your oven to 500 degrees. You don’t actually cook the steak at 500 for any amount of time, you just want the oven very hot from the beginning.

Step 2


Picture
Dry rub the roast with seasoning. I simply put kosher salt (regular or sea salt will work) and freshly cracked black pepper. Coarse black pepper will work also if you do not have a cracker. Make sure you get a very good coating on the roast. You can go heavier than you normally would with the salt/pepper. I also put ground mustard. I’m sure you could add all sorts of seasonings if you wish. Some people cut slivers of garlic and insert them into the roast.

Step 3


Picture
Place the roast onto a baking pan. We used a glass pyrex baking dish. I also cover the pan with tin foil to make clean up easier. When the roast cooks, it will release some juices, which I love to serve along side the roast. Therefore, it’s better to have a dish with a little bit of a lip to catch the juices.

Step 4


Picture
So, you should have an oven that is at 500 degrees. Before you place in the roast, turn the oven down to 475 and place the roast in. You are cooking this roast for 7 minutes per pound. (on a side note: we cooked ours for 7 minutes per pound and it was cooked throughly. If you like your roasts more RARE, then I would suggest going down to 6 minutes per pound. Otherwise, leave at 7.)Once that time is up, turn off your oven, however, do not take out the roast. Also, it’s very important that you do NOT OPEN the oven. You are letting this sit for 2.5 hours.

Step 5

Picture